Pop-up view component (Dialog)
Dialog is a pop-up view component, mainly used for pop-up panels.
1. Create Dialog through LayaAir IDE
1.1 Create Dialog
As shown in Figure 1-1, click to select the Dialog component in the widget panel, drag and drop it into the page editing area, or create it by right-clicking in the hierarchy window to add the Dialog component to the page.

(Picture 1-1)
1.2 Introduction to Dialog attributes
The unique attributes of Dialog are as follows:
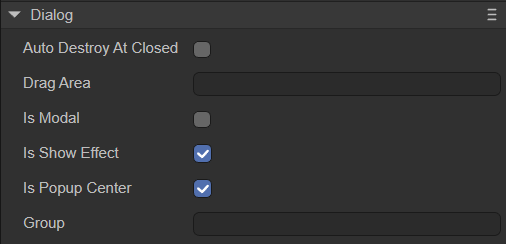
(Figure 1-2)
| Properties | Function |
|---|---|
| autoDestoryAtClosed | Whether the scene is automatically destroyed (destroying nodes and used resources) after the scene is closed. The default is false |
| dearArea | Drag area (format: x,y,width,height), the default value is "0,0,0,0" |
| isModal | Whether it is a modal window, the default is false. When it is a modal window, click on the blank space of the pop-up window to automatically close the pop-up window |
| isShowEffect | Whether to display the pop-up effect, the default is on. When false, there is no pop-up effect and the pop-up window is displayed directly |
| isPopupCenter | Specifies whether the dialog box pops up in the center, the default is true. When it is false, the coordinate origin of the upper left corner will pop up |
| group | Set the group ID of resources. After setting, resources can be loaded or cleaned by group. |
After setting the dragArea attribute, the Dialog can be dragged within the set value range. Set it to "0,0,100,100", the effect is as shown in the animation 1-3, the red area is the draggable area. After setting, you can only drag within the set value. Dragging in the area beyond the value is invalid.
(Animation 1-3)
1.3 Script control Dialog
1.3.1 Create pop-up window
Dialog's pop-up effect requires it to be used as the root node. You can create a 2D prefab Prefab2D in the project resource panel, as shown in Figure 1-4.
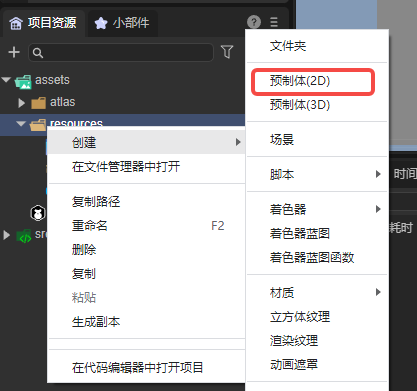
(Figure 1-4)
Double-click Prefab2D to enter the editing interface. Right-click the root node, select "Convert Node Type", and select UI->Dialog, as shown in the animation 1-5.
(Animation 1-5)
Then, you can create a pop-up page in the editing interface of the prefab. The result is shown in Figure 1-6.
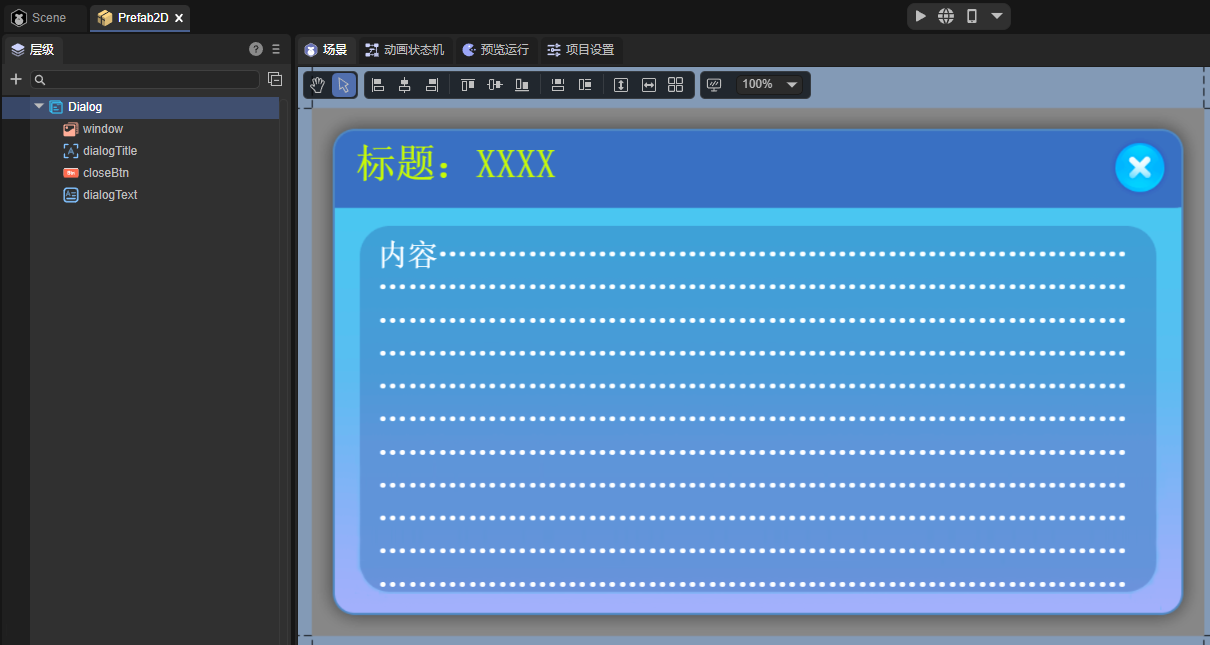
(Figure 1-6)
The UI image resources in the picture are from "2D Getting Started Example".
1.3.2 Set the close button
In the pop-up page, there is a close button (closeBtn), and a script needs to be added to implement the logic of closing the page. As shown in the animated picture 1-7, check the define variable option of closeBtn, and then double-click "UI Runtime" of Prefab2D to create a UI component script.
(Animation 1-7)
After saving the scene, add the following code in RuntimeScript.ts:
const { regClass } = Laya;
import { RuntimeScriptBase } from "./RuntimeScript.generated";

@regClass()
export class RuntimeScript extends RuntimeScriptBase {

    onAwake(): void {
        this.closeBtn.on(Laya.Event.CLICK, this, () => {
            this.close();
        });
    }

}
1.3.3 Related scenarios
After setting up the pop-up window, you need to use code to associate the Dialog with the scene tube that needs to use the Dialog. Return to the initial scene Scene and add a custom component script in the property settings panel of Scene2D. Add the following code to pop up the Dialog page after a mouse click:
const { regClass, property } = Laya;

@regClass()
export class NewScript extends Laya.Script {

    //Execute after mouse click
    onMouseClick(): void {
        //Using Prefab, you need to convert the root node to Dialog
        Laya.loader.load("resources/Prefab2D.lh").then(res => {
            let dlg: Laya.Dialog = res.create();
            dlg.show();
        });
    }
}
The running effect is as follows:
(GIF)
2. Create Dialog through code
When writing code, it is inevitable to control the UI through code, create the UI_Dialog class, and set Dialog-related properties through code. The sample code is as follows:
const { regClass, property } = Laya;

@regClass()
export class UI_Dialog extends Laya.Script {

    private DIALOG_WIDTH: number = 220;
    private DIALOG_HEIGHT: number = 275;
    private CLOSE_BTN_WIDTH: number = 43;
    private CLOSE_BTN_PADDING: number = 5;

    private assets: any[];
    private dialog: Laya.Dialog;

    constructor() {
        super();
    }

    // Executed after the component is activated. At this time, all nodes and components have been created. This method is only executed once.
    onAwake(): void {
        //Image resources come from "Engine API Usage Example"
        this.assets = ["resources/res/ui/dialog (1).png", "resources/res/ui/close.png"];
        Laya.loader.load(this.assets).then( ()=>{
            this.onSkinLoadComplete();
        } );
    }

    private onSkinLoadComplete(e: any = null): void {
        this.dialog = new Laya.Dialog();

        let bg: Laya.Image = new Laya.Image(this.assets[0]);
        this.dialog.addChild(bg);

        let button: Laya.Button = new Laya.Button(this.assets[1]);
        button.name = Laya.Dialog.CLOSE;
        button.pos(this.DIALOG_WIDTH - this.CLOSE_BTN_WIDTH - this.CLOSE_BTN_PADDING, this.CLOSE_BTN_PADDING);
        this.dialog.addChild(button);

        this.dialog.dragArea = "0,0," + this.DIALOG_WIDTH + "," + this.DIALOG_HEIGHT;
        this.dialog.show();
    }

    onDestroy(): void {
        if (this.dialog) {
            this.dialog.close();
        }
    }
}
The effect is shown in the following animation:
(Animation 2-1)