Multi-line input text component (TextArea)
Since TextArea inherits from TextInput, the two have too many similarities. This article only introduces the differences between the two. The points introduced by TextInput will not be explained in detail here. For details, please refer to TextArea API.
1. Using TextArea in LayaAir IDE
1.1 Create TextArea
As shown in Figure 1-1, you can right-click in the Hierarchy' window to create it, or you can drag and drop from theWidgets' window to add it.
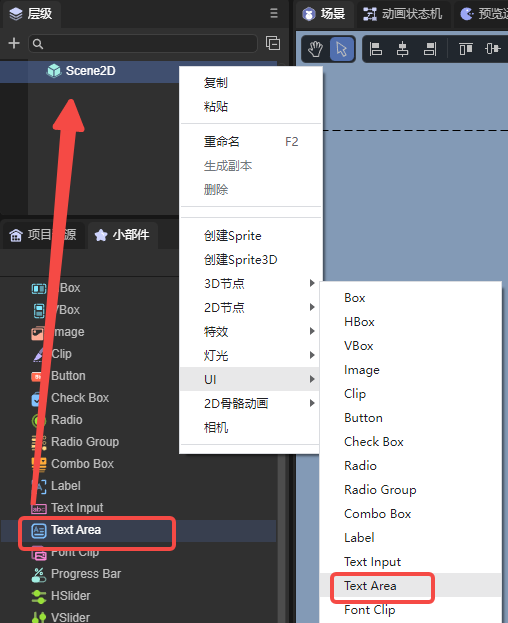
(Picture 1-1)
1.2 Introduction to TextArea properties
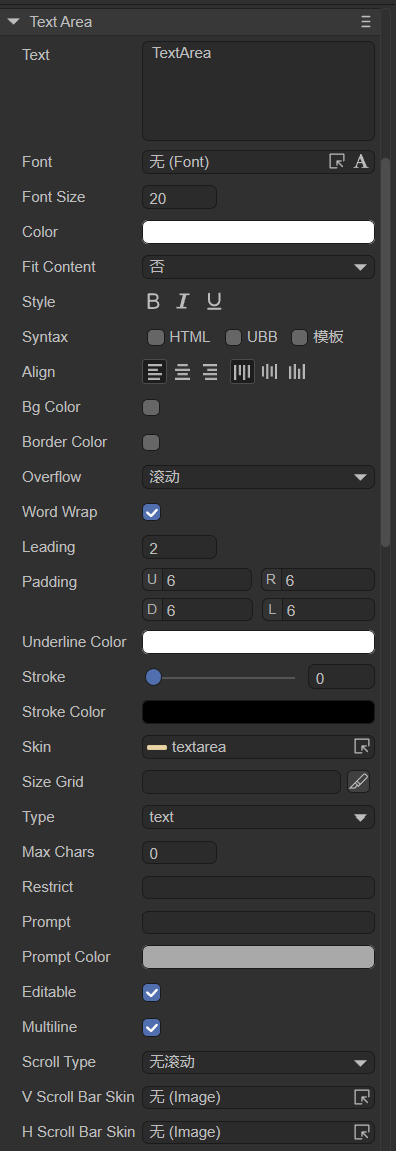
(Figure 1-2)
Properties: text, font, fontSize, color, style, syntax, align, bgColor, bordercolor, overflow, wordWrap (default is true), leading, padding, underlinecolor, stroke, strokeColor, skin, sizeGrid, type, maxchars, restrict, prompt, promptcolor, editable, multiline (default is true);
The above properties have been listed in Input Text Component and will not be described in detail here. The differences are marked in parentheses.
TextArea has more properties than TextInput as follows:
| Properties | Function description |
|---|---|
| vscrollbarskin | Add vertical scrollbar skin |
| hscrollbarskin | Add horizontal scroll bar skin |
| scrolltype | The scrolling type of the text field needs to be used with the corresponding scroll bar skin. There are four types: none: no scrolling (default), horizontal: horizontal scrolling, vertical: vertical scrolling, both: both horizontal and vertical scrolling |
TextArea is a text field for multiple lines. The difference compared to TextInput is that it can add vertical scroll bar skin and horizontal scroll bar skin. The horizontal scrolling effect is shown in the animation 1-3, and the vertical scrolling effect is shown in the animation 1-4.
(Animation 1-3)
(Animation 1-4)
1.3 Script control TextArea
const { regClass, property } = Laya;

@regClass()
export class TextAreaControl extends Laya.Script {
    //declare owner : Laya.Sprite3D;

    @property( { type : Laya.TextArea } )
    public txtarea: Laya.TextArea;

    constructor() {
        super();
    }

    /**
     * Executed after the component is activated. At this time, all nodes and components have been created. This method is only executed once.
     */
    onAwake(): void {
        this.txtarea.pos(Laya.stage.width >> 1, Laya.stage.height >> 1); //Position
        this.txtarea.size(500, 200); //Size
        this.txtarea.pivot(this.txtarea.width/2, this.txtarea.height/2); //Pivot Point
        this.txtarea.text = "Hello everyone, developers are welcome to use LayaAir IDE. Here is the text content of TextArea. You can debug based on this text";
        this.txtarea.font = "宋体"; //Font
        this.txtarea.fontSize = 50; //Font size
        this.txtarea.color = "#ff0000"; //Font color
        this.txtarea.bold = true; //bold
        this.txtarea.italic = true; //italic
        this.txtarea.underline = true; //underline
        this.txtarea.underlineColor = "#ff0000"; //Underline color
        this.txtarea.stroke = 5; //stroke width
        this.txtarea.strokeColor = "#000000" ; //Stroke color
        this.txtarea.wordWrap = true; //Automatically wrap lines
        this.txtarea.overflow = "scroll"; //Text overflow
        this.txtarea.skin = "atlas/comp/textarea.png"; //Skin
        this.txtarea.borderColor = "#f6ff03" //Border color

        this.txtarea.scrollType = Laya.ScrollType.Vertical; //Scrolling method
        this.txtarea.vScrollBarSkin = "atlas/comp/vscroll.png"; //Scroll bar skin
    }

}
Developers should pay attention to the scrolling mode setting code:
Laya.ScrollType.Vertical, which is vertical scrolling;Laya.ScrollType.Horizontal, which is horizontal scrolling. Different scrolling methods require setting corresponding scroll bar skins.
2. Create TextArea through code
const { regClass, property } = Laya;

@regClass()
export class UI_TextArea extends Laya.Script {

    private skin: string = "resources/res/ui/textarea.png";

    constructor() {
        super();
    }

    /**
     * Executed after the component is activated. At this time, all nodes and components have been created. This method is only executed once.
     */
    onAwake(): void {

        Laya.loader.load(this.skin).then( ()=>{
            this.onLoadComplete();
        } );
    }

    private onLoadComplete(e: any = null): void {

        let ta: Laya.TextArea = new Laya.TextArea("");
        ta.skin = this.skin;

        ta.font = "Arial";
        ta.fontSize = 18;
        ta.bold = true;

        ta.color = "#3d3d3d";

        ta.pos(100, 15);
        ta.size(375, 355);

        ta.padding = "70,8,8,8";

        this.owner.addChild(ta);
    }
}
(The image resources in the code are from the "Engine API Usage Example" project, developers can create and download them by themselves)
operation result:
(Figure 2-1)